
Four Gates, One Page: How to Run This Checklist
The checklist is sequenced so each gate is cheaper than the one after it. Gate 1 costs a straightedge pass before anyone opens a mortar bag; Gate 4 costs an hour of paperwork at handover. Running them out of order is how defects survive to the final invoice — coverage voids are invisible under grout, and a substrate hump is invisible under everything.
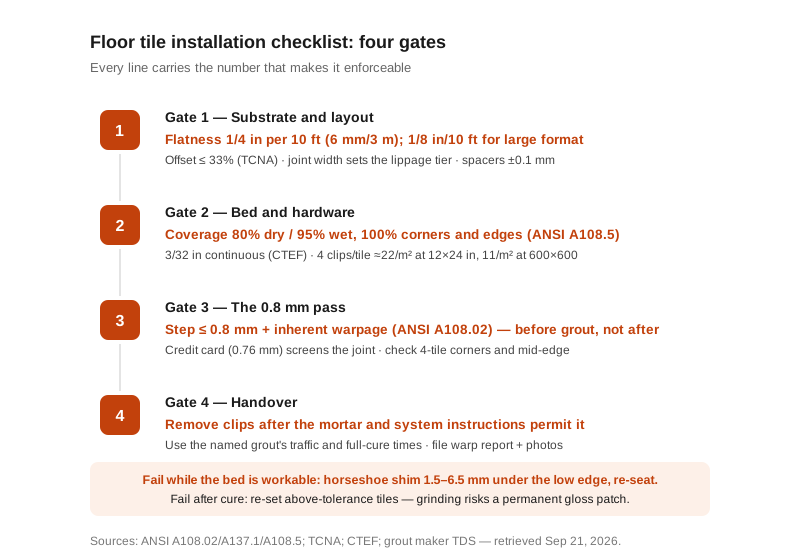
Bottom line: use 6 mm/3 m for the standard substrate plane, 80/95% for mortar coverage and 0.8 mm plus warpage for narrow-joint lippage. Clip removal has no universal hour value: the mortar maker's cure window and the selected system's instructions govern.
Gate 1 — Substrate and Layout: The Checks Before Mortar
Nobody argues about a floor they have not seen the base of, so Gate 1 happens with the slab exposed:
- Flatness: standard tile (all edges under 15 in) needs the substrate flat to 1/4 in per 10 ft (6 mm/3 m) with no more than 1/16 in departure over 1 ft; large-format tile (any edge 15 in or more) tightens to 1/8 in per 10 ft (3 mm/3 m). The full tier table lives in our tile substrate flatness requirements guide.
- Pattern: on rectangular large formats, cap running-bond offset at 33% of tile length (TCNA Handbook) — 50% offsets stack tile crown on tile crown and manufacture lippage out of compliant product.
- Joint width: decide it now, because it sets the lippage tier you will be held to at Gate 3 — 0.8 mm on joints under 1/4 in, 1.6 mm at 1/4 in and wider.
- Spacers: if joint width is specified, the spacers must hold it — select the named Cross, T or Y model from the placement drawing, then verify the installed joint with the agreed measurement and acceptance method. A nominal spacer size is not a universal finished-joint tolerance.
A substrate that fails here does not get tiled — it gets ground, patched or leveled. Every dollar spent at Gate 1 is the cheapest money on the job.
Gate 2 — Coverage and Clips: What the Open Bed Must Show
The bed is the floor's last leveling layer and it is only level where it exists. While mortar is open, verify:
- Coverage: 80% for dry interiors, 95% for wet and exterior areas, 100% at corners and edges per ANSI A108.5 mortar coverage requirements — with a continuous minimum of 3/32 in achieved by trowel (CTEF). Comb in straight lines in one direction, back-butter large tiles, and lift a test tile to read the transfer.
- Clip line: 4 tile leveling clips per tile, corners shared — ≈22 clips/m² at 300×600 mm (12×24 in), ≈11/m² at 600×600 mm, ≈6/m² at 600×1200 mm. Under-clipping lets a tile rotate into the bed as it cures; the step surfaces a week later as a callback.
One weekly habit catches most of it: photograph a lifted test tile per room. That photo is the cheapest exhibit your claim file will ever contain.
Gate 3 — The 0.8 mm Pass: Measure Before the Grout Goes Down
This is the gate that decides who pays, and it only exists before grouting — after the grout float, an above-tolerance step becomes someone's word against someone else's. The standard: the step between adjoining tiles stays at or under 0.8 mm (1/32 in) plus the tile's inherent warpage on joints under 1/4 in (ANSI A108.02 §4.3.7). The full allowance ladder, including the 1.6 mm tier on wide joints, is in our ANSI lippage tolerance limits guide.
Field method: stretch a straightedge across joints at four-tile corners and at mid-edge on long formats (centre bow there is a warpage signature, not an install fault), then pocket-screen borderline joints with a credit card — 0.76 mm thick, which sits just under the 0.8 mm line. If the card passes freely and the straightedge confirms, the floor passes Gate 3. Record the readings; Gate 4 files them.
Gate 4 — Handover: Cure Times, Cleanup, Paper Trail
The last gate is time, not tools:
- Clips come out after the required cure window — follow the mortar manufacturer's timing and the selected leveling system's removal instructions. Break the clip in the instructed direction; do not pull against an edge that may still move.
- Traffic waits for the grout: use the grout maker's stated light-traffic and full-cure times for the named product, temperature and site conditions. Do not transfer one product's hour value to every installation.
- The paper trail: warp report from the boxes, batch photos, Gate 3 straightedge readings. A handover package with numbers in it converts a complaint into a claim decision — fast.
When a Gate Fails: Fix While It Is Workable
Every gate has a cheap failure path while materials are still open. Substrate humps get ground or patched before mortar. Coverage voids get re-combed and re-set while the bed is wet — which is why the lifted test tile belongs in Gate 2, not at handover. A tile sitting low at a joint takes a horseshoe shim — 1.5 to 6.5 mm, slipped under the low edge into workable adhesive and left embedded — and re-seats against its clips in seconds.
After the cure, the menu narrows to what the tolerance line says. Steps within the 0.8 mm-plus-warpage allowance need no remedy at all, whatever the raking light suggests; steps above it get lifted and re-set on full-coverage mortar. Grinding the high edge on polished or large glazed surfaces risks a permanent gloss patch that reads worse than the step — it is the one fix we advise against at every price point.
If you are putting hardware against this checklist for a crew or a distributor program, our tile leveling system wholesale supplier page carries the range, MOQs and spec sheets to quote from.
What should I check before floor tile installation starts?
Gate 1, with the slab exposed: substrate flatness of 1/4 in per 10 ft (6 mm/3 m) for standard tile or 1/8 in per 10 ft (3 mm/3 m) for large formats; running-bond offset capped at 33% of tile length on rectangular large tiles; joint width chosen because it sets the lippage tier; and the named spacer model plus an agreed method for checking the installed joint width.
How do I check lippage before grouting?
Stretch a straightedge across joints at four-tile corners and mid-edge on long formats. The step must stay at or under 0.8 mm (1/32 in) plus the tile's inherent warpage per ANSI A108.02 on joints under 1/4 in. Pocket-screen borderline joints with a credit card — 0.76 mm thick, just under the limit. Measure before the grout goes down; afterwards the record is only testimony.
How long should tile leveling clips stay in place?
There is no universal 24-hour removal rule. Remove the clips only after the mortar maker's cure window and the selected leveling system's instructions allow it, then break them in the instructed direction below the tile surface. Grout traffic and full-cure timing also come from the named grout product's data sheet and actual site conditions.
What mortar coverage does a tile floor need?
ANSI A108.5 sets 80% coverage for dry interior areas, 95% for wet and exterior areas, and 100% at corners and edges, achieved with a continuous minimum 3/32 in bed by trowel (CTEF). Verify by lifting a test tile while the mortar is open and photographing the transfer pattern.
Send your formats and joint widths — we will return the four gates with clip counts and tolerances pre-calculated for the job.
Get the Filled-In Version →