
Prepare the Tile, Mortar, and Matching Clip System
Before spreading mortar, identify the clip model, compatible wedge, intended grout-joint width, tile thickness range, and the manufacturer’s placement/removal instructions. The listed joint widths for our tile leveling clips range from 0.5mm to 4.5mm; select the variant for the joint you are building, rather than treating joint width as the tile’s thickness.
Prepare the substrate and mortar for the tile and site conditions. Follow the mortar technical data sheet for trowel selection, mixing, open time, cure, and grouting. For example, CUSTOM’s VersaBond data sheet describes combing mortar ridges in one direction and notes that cure time depends on temperature and humidity; use the instructions for the actual mortar on the job.
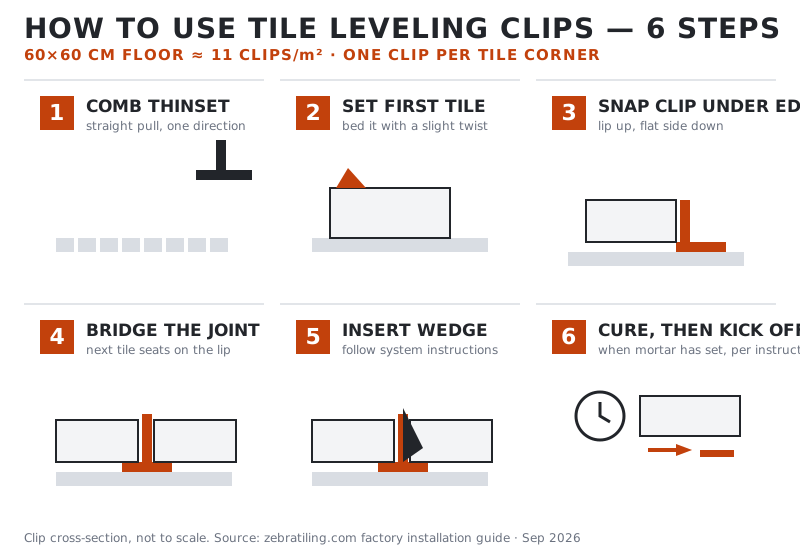
Install Tile Leveling Clips in 6 Steps
- Comb mortar as directed. Use the trowel and coverage method specified for the tile and mortar. Do not set tiles into mortar that has skinned over beyond its open time.
- Set and align the first tile. Bed it using the mortar manufacturer’s method, then establish the reference edge for the next tile.
- Place the clip base under the tile edge. Keep the tab in the orientation shown in the clip-system instructions. Follow the specified number and positions of clips for the tile size and layout.
- Set the adjoining tile over the clip base. Check joint width and alignment with the layout; the clip should sit in the joint as designed rather than being forced into a tight space.
- Insert the matching wedge. Tighten it only enough to achieve the intended alignment and within any limit in the system instructions. Do not assume a universal plier-click count or drive the wedge past its stop.
- Clean the joint and repeat. Remove mortar from the joint and the parts of the clip system that must remain accessible, following the product instructions. This makes later removal and grouting easier.
If Clips Break Early, Check 4 Conditions
A clip that breaks during insertion or tensioning should not be treated as a signal to apply more force. Stop and inspect the setup before continuing across the floor:
- Model and wedge compatibility: confirm that the wedge profile is approved for the selected clip opening.
- Tile-thickness capacity: verify that the tile and mortar-bed position fit the clip model's usable opening.
- Tension: stop at controlled edge alignment; do not force the wedge beyond its travel or use a universal plier setting.
- Part and orientation: replace visibly damaged clips and follow the model's base and break-tab direction.
Record the clip model, wedge, tile thickness, joint width, batch and failure position if the problem repeats. That evidence helps separate a compatibility or setup issue from a product-lot concern.
How Many Clips Does a Floor Need?
Count clips from the tile layout and the specific system’s placement directions. As a simple example, a regular 60×60cm floor grid with one clip at each shared tile corner uses about 11 clips per m². That corner-count method does not apply to every pattern or large-format tile; for other sizes, use the sizing method in our tile leveling clip quantity guide. Fine joints also need the joint-width and warpage checks in the rectified tile installation guide.
Do not add an automatic percentage for walls or assume that a per-square-meter estimate determines every clip location. Follow the system manufacturer’s layout guidance and check the tile support and substrate separately.
For one crew working sequentially, the established 1:3 wedge-to-clip ratio is the stocking baseline: one reusable wedge for every three clip positions. In the 60×60cm example above, about 11 clips/m² means roughly 4 wedges/m²; a 100-piece wedge bag plans about 25m² before losses. Add working sets for crews installing simultaneously and allow for jobsite losses.
When and How to Remove Clips
Removal depends on the leveling system and setting material. Follow the mortar data sheet for when the tile assembly has set sufficiently and the clip-system maker for the removal direction. For example, QEP’s LASH instructions say to remove its clips once the mortar has set and to save the wedges for future use. That product instruction is not a universal cure-time rule for every mortar and clip.
If the system calls for clip removal before grouting, remove wedges as directed, then break the clip in the specified direction along the joint. Clear the joint to the depth required for grout. Do not grout over a clip or wedge that the system instructions say to remove.
What Clips Can—and Cannot—Correct
A leveling clip can help align neighboring tile edges while the setting material cures. It does not flatten an uneven substrate, correct a warped tile, or replace proper mortar coverage. If the surface still shows lippage, check substrate flatness, tile warpage, mortar coverage, clip placement, and wedge pressure before assuming the clip itself is the cause.
For a different symptom—clips that will not break off cleanly—see our tile leveling clip removal troubleshooting guide.
Frequently Asked Questions
How long should I wait before removing tile leveling clips?
Use the mortar manufacturer’s cure instructions and the clip-system manufacturer’s removal instructions; do not assume a universal 24-hour wait. For example, QEP LASH says to remove its clips once the mortar has set.
Should tile leveling clips be removed before grouting?
Follow the specific clip-system instructions. If they call for clip removal before grouting, remove the wedges and clips as directed, then clear the joint to the required depth before applying grout.
How many tile leveling clips are needed per square meter?
A regular 60×60cm floor grid with one clip at each shared tile corner uses about 11 clips per m². Other tile sizes, patterns, and large-format layouts need a separate count based on the clip manufacturer’s placement guidance.
How many wedges should I stock relative to clips?
For one crew working sequentially, use the established 1:3 wedge-to-clip ratio. A 60×60cm shared-corner layout uses about 11 clips/m², so plan roughly 4 reusable wedges/m²; a 100-piece wedge bag covers about 25m² before losses. Add working sets for simultaneous crews.
Can tile leveling clips fix an uneven floor?
No. Clips help align adjacent tile edges; they do not correct substrate flatness, tile warpage, or inadequate mortar coverage. Check and prepare those conditions separately.
Need clips for a specific grout joint? Share the joint width, tile thickness, and layout with our team through the tile leveling system wholesale page so we can confirm a matching product.