
How Many Tile Leveling Clips Per Square Meter — Calculator Guide
If you've ever stared at a tile floor and wondered "how many clips do I actually need?" — you're not alone. Over-ordering wastes money. Under-ordering stalls your project. This guide gives tile leveling system wholesale buyers a transparent planning formula, then compares it with published manufacturer consumption figures so a project in China or any destination market can be ordered against the selected system rather than a universal guess.
The selected system still governs: Bostik publishes 8 clips/m² at 60×120cm and 6/m² at 120×120cm, while RUBI calls for about 500mm spacing on large-format slabs.
Bottom line: For standard 60×60cm tile, both the planning formula and Bostik's published table give about 11 clips/m², so a 200m² project takes 2,200 clips before contingency; a worked 5% allowance would make 2,310 clips, or 24 bags.
The Formula: How Clip Count Is Calculated
For a standard-format planning estimate, allocate four clip positions per tile across its shared edges. This produces the same 11 clips/m² figure that Bostik publishes for 60×60cm tile. It is a planning model; the selected system's placement drawing takes priority.
Where Tiles per m² = 10,000 ÷ (tile width cm × tile height cm). For example, a 60×60 tile = 10,000 ÷ 3,600 = 2.78 tiles/m² → 2.78 × 4 = ~11 clips/m². Do not apply a fixed wall multiplier: wall and floor quantities follow the chosen system's instructions, edge positions and layout.
Complete Clip Count Chart by Tile Size
The comparison below separates the simple four-position model from Bostik's published consumption table. Use the Bostik column only for that system; use the current instructions for other tile leveling clips.
| Tile size | 4-position model | Bostik published rate | 50m² at Bostik rate | 200m² at Bostik rate |
|---|---|---|---|---|
| 30×60cm | 22/m² | 22/m² | 1,100 (11 bags) | 4,400 (44 bags) |
| 40×40cm | 25/m² | 25/m² | 1,250 (13 bags) | 5,000 (50 bags) |
| 60×60cm | 11/m² | 11/m² | 550 (6 bags) | 2,200 (22 bags) |
| 60×120cm | 6/m² | 8/m² | 400 (4 bags) | 1,600 (16 bags) |
| 80×80cm | 6/m² | 9/m² | 450 (5 bags) | 1,800 (18 bags) |
| 100×100cm | 4/m² | 8/m² | 400 (4 bags) | 1,600 (16 bags) |
| 120×120cm | 3/m² | 6/m² | 300 (3 bags) | 1,200 (12 bags) |
Bostik figures are system-specific and published in its Leveling System brochure; bags assume 100 clips and are rounded up. No contingency is included. Source retrieved September 21, 2026.
Large Formats Break the 4-Per-Tile Rule
The simple model starts with four allocated positions per tile, while the selected system instructions govern at every format. As the edge length grows, a corner-only count can understate the positions shown in manufacturer guidance: Bostik publishes 6 clips/m² at 120×120cm, twice the four-position model's 3/m² result.
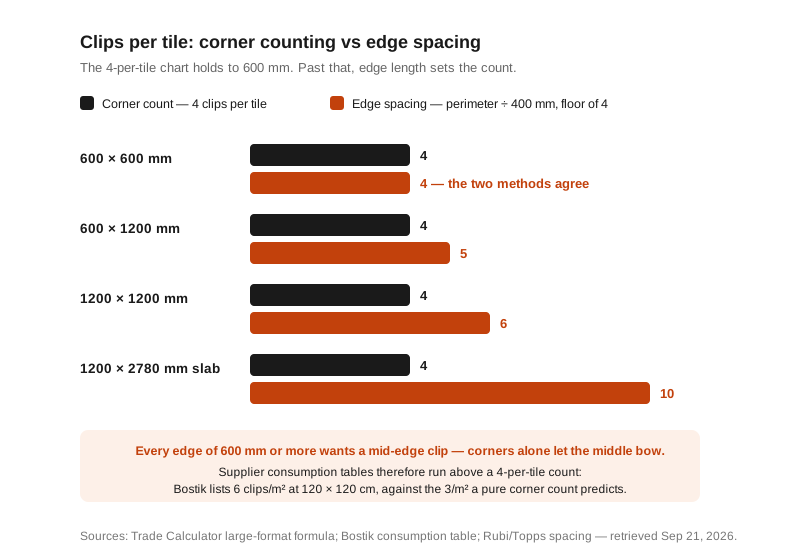
For planning, the calculator uses clips per tile = max(4, ceil((width + height) ÷ 400mm)) — a 1200×1200 tile lands on 6 clips and a 1200×2780 slab on 10. This is a transparent baseline rather than a universal specification. RUBI says large-format clips should be spaced approximately 500mm apart. Bostik's system table is denser: 8 clips/m² at 60×120cm, 9/m² at 80×80cm, and 6/m² at 120×120cm. Follow the placement drawing for the clip system being installed. Sources: RUBI large-format installation guidance, retrieved September 27, 2026; Bostik leveling-system consumption table, retrieved September 21, 2026
Tabulated across the formats that actually get quoted, the two methods diverge like this:
| Tile Size | Tiles per m² | Corner Count (clips/m²) | Edge Spacing (clips/tile) | Edge Spacing (clips/m²) |
|---|---|---|---|---|
| 60×120cm | 1.39 | 6 | 5 | 7 |
| 80×80cm | 1.56 | 6 | 4 | 6 |
| 100×100cm | 1.00 | 4 | 5 | 5 |
| 120×120cm | 0.69 | 3 | 6 | 4 |
| 120×240cm | 0.35 | 1 | 9 | 3 |
| 120×278cm | 0.30 | 1 | 10 | 3 |
*Four-position count = 4 allocated positions per tile. Edge-spacing values use the disclosed ZEBRA planning formula above; tiles per m² = 10,000 ÷ tile area in cm². Compare both planning columns with the selected system's current instructions. Bostik table retrieved September 21, 2026.*
Offset and herringbone layouts change the junction positions, so ask the supplier for a placement drawing rather than transferring the straight-lay number. Joint width is another variable: the clip base must match the specified joint and tile thickness, mapped in our tile leveling clip thickness guide. When clips will not break off after curing, use the diagnosis steps in why tile leveling clips won't break off.
Imperial Projects: Square Feet → Clips → Bags
US and UK job sheets arrive in square feet; clips arrive in 100-piece bags. Run the conversion once and keep it: 1 m² = 10.764 sq ft. Worked example on a 3,100 sq ft floor at the standard 60×60 rate of 11 clips/m²:
At 34 bags the order clears the 500-bag MOQ only when combined with other products or projects — the same position as the 200m² example above, and the reason most first orders mix clips, wedges and spacers in one container. If the spec is large-format rather than 60×60, re-run the count with the shared-edge formula before converting: on 1200×1200 the clip figure per m² rises above the corner-only floor, and a bag count quoted from four corners alone can come up short.
Wall Counts: Use the Placement Drawing, Not a Fixed Multiplier
There is no verified rule that every wall needs a fixed percentage more clips than the same floor area. Bostik states that its system is suitable for both wall and floor tile and publishes one size-based consumption table, without a separate wall multiplier. A wall layout can still change the count because cut edges, openings, running-bond junctions and the selected system's edge positions differ from a simple floor grid.
For a wall order, mark every clip position on one representative elevation, multiply by the number of repeated elevations, then add the buyer's documented contingency. For container-level buying, our tile leveling clips wholesale sourcing guide covers MOQ and packaging, while the tile leveling systems catalog shows the available component families.
Real-World Example: A 200m² Commercial Floor
Let's calculate a real wholesale order for a restaurant project using 60×60cm tiles:
The 5% above is a transparent worked assumption, not an industry rule. Replace it with the allowance supported by the actual layout, breakage record and site process. This example remains below the 500-bag factory MOQ, so wholesale buyers normally combine products or projects.
How Many Wedges Do I Need Compared to Clips?
Use the established 1:3 wedge-to-clip ratio as the planning baseline for one crew working sequentially. Wedges can be removed and reused when the system and setting-material instructions allow; add working sets for crews installing simultaneously and allow for jobsite losses.
For example, this guide estimates about 11 clip positions per m² for its regular 60×60cm shared-corner floor layout, which gives roughly 4 reusable wedges per m² at the 1:3 ratio. See our tile leveling wedge quantity guide for the planning method.
Common Mistakes That Waste Hundreds of Clips
Mistake #1: Using the Same Spacing for All Tile Sizes
A 30×30 tile covers 0.09m², so you get 11.1 tiles per m². At 4 clips per tile, that's ~44 clips per m². Compare that to a 60×60 tile: 2.78 tiles/m² × 4 = ~11 clips per m². That's a 4× difference in clip consumption between these two tile sizes.
Mistake #2: Forgetting About Cut Tiles
Perimeter cuts still need clips along the edges that meet adjacent tiles. Do not apply a universal cut-tile percentage: count the room perimeter, openings and pattern transitions on the layout, then add those positions to the field count.
Mistake #3: Buying Based on Price Alone
Do not compare quotations on bag price alone. Confirm the clip model, joint width, tile-thickness range, pieces per bag, resin declaration, approved sample and agreed inspection method before comparing the current FOB price.
Frequently Asked Questions
How many tile leveling clips do I need per m² for standard 60×60cm tiles?
For standard 60×60cm floor tiles you need approximately 11 clips per m². The formula is tiles per m² × 4 clips per tile: 10,000 ÷ (60 × 60) = 2.78 tiles per m², so 2.78 × 4 = ~11 clips/m². A 30×30 tile consumes ~44 clips/m². For 120×120, the four-corner floor is ~3/m², while the calculator adds mid-edge positions and uses ~4.2/m².
How many clips do I need for a 200m² commercial project?
At 11 clips per m², a 200m² 60×60cm project takes 2,200 clips before contingency. If the buyer uses a documented 5% worked allowance, the order becomes 2,310 clips, which rounds up to 24 bags at 100 clips per bag. Wall quantities must be counted from the selected system's placement drawing rather than a fixed multiplier.
Do wall installations need more clips than floors?
Not by a universal percentage. Bostik publishes one size-based consumption table for its wall-and-floor system and does not state a separate wall multiplier. Count the selected system's positions on the wall elevation, including cut edges, openings and pattern junctions.
How many wedges do I need compared to clips?
For one crew working sequentially, use the 1:3 wedge-to-clip ratio as the planning baseline. Add working sets for simultaneous crews and allow for jobsite losses; reuse wedges after the system and setting material permit removal.
How many clips do I need for large format tiles like 1200×1200?
Do not use the four-corner floor as a large-format specification. The calculator's shared-edge baseline is max(4, ceil((width + height) ÷ 400mm)): a 1200×1200 tile takes 6 allocated positions and a 1200×2780 slab 10. RUBI says large-format clips should be spaced approximately 500mm apart, and Bostik lists 6 clips/m² at 120×120cm. Follow the selected system's placement drawing when it differs from the planning estimate.
How do I convert square feet to clips and bags?
Divide square feet by 10.764 to get m², multiply by the selected system's clips-per-m² rate, add the project's documented contingency, then divide by the pack count. A 3,100 sq ft example is 288m² and 3,168 clips at 11/m²; using a worked 5% allowance produces 3,326 clips, or 34 bags of 100.
How many tile spacers per square meter?
No universal clip-to-spacer quantity ratio applies. Leveling clips sit along tile edges, while cross, T and Y spacers follow different pattern junctions. Grupo Puma publishes 4 ordinary spacers/m² for 60×60cm tile, compared with Bostik's 11 leveling clips/m² for its 60×60 system. Use the separate guide to how many tile spacers do I need for the published spacer table.
How many square meters does one bag of 100 clips cover?
At 11 clips/m² for 60×60cm tile, one 100-clip bag covers about 9m² before contingency. Using Bostik's published 6 clips/m² for 120×120cm tile, the same bag covers about 16.7m²; at 22 clips/m² for 30×60cm tile it covers about 4.5m². Apply the current table for the selected system.
How many tile leveling clips do I need for 12x24 tile?
Roughly 22 clips/m². A 12 × 24 in tile is 30 × 60 cm, so 10,000 ÷ 1,800 = 5.56 tiles/m², and 5.56 × 4 corner clips = 22.2 clips/m². It is a large-format unit - one side is over 15 in - so add the large-format allowance and expect the long edges to take a mid-edge clip rather than a strict corner count.
How many clips do I need for a 60 m² floor?
For 60×60cm tile, 60m² × 11 clips/m² = 660 clips, or 7 bags before a project-specific contingency. Using Bostik's published table, 120×120cm tile needs 360 clips (4 bags) and 30×60cm tile needs 1,320 clips (14 bags) for the same area.
How many clips for a 2,000 sq ft floor?
2,000 sq ft is 185.8m² (÷10.764). At 11 clips/m² for 60×60cm tile that is 2,044 clips, or 21 bags before contingency. Using Bostik's published table, 120×120cm tile needs about 1,115 clips (12 bags), while 30×60cm tile needs about 4,088 clips (41 bags).
Do I count cut tiles when ordering clips?
Yes. Perimeter cuts still take clips where their edges meet adjacent tiles, while openings, diagonal layouts and herringbone add more unique junctions. Count those positions from the layout and set the contingency from the project's own breakage and installation record; no single percentage applies to every room.
How many clips per 100 square feet?
About 102 clips at 11 clips/m² for 60×60cm tile: 100 sq ft = 9.29m², and 9.29 × 11 = 102. Using Bostik's published table, 30×60cm tile needs about 205 clips and 120×120cm tile about 56 clips for the same area.
How do I calculate clips for a herringbone or offset layout?
Count the T-junctions, not just the corners. An offset or herringbone layout puts three tile corners together at each T, and that junction needs its own clip; a straight lay has none. Take the field count, add each required T-junction position from the selected system's drawing, then apply the project's documented contingency.
Build a Clip-Count Plan
Use the calculator for a transparent size-based estimate, then check it against the selected system's placement drawing before ordering.