
Bottom line: measure first. The same visible step can come from different causes, and the repair changes with the cause.
Lippage on Large Tiles Starts With a Measurement
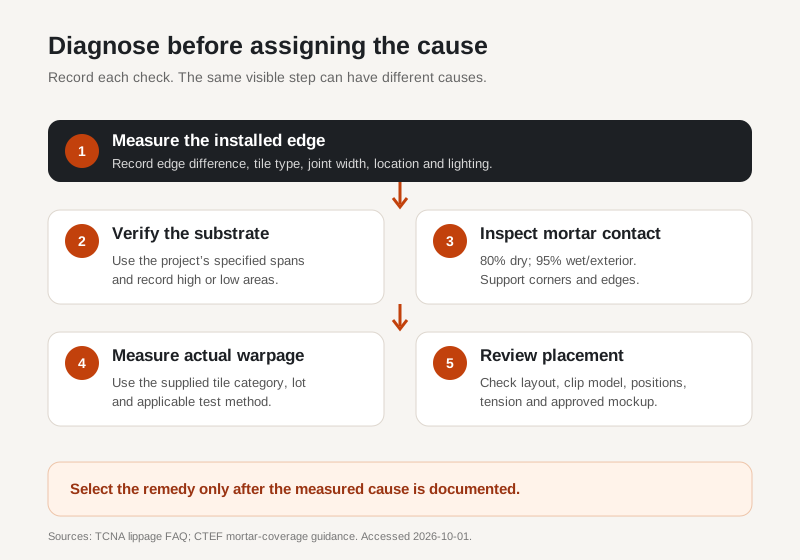
Place a suitable straightedge or lippage gauge across the joint and record the difference between adjacent tile edges. Also record the tile type, nominal dimensions, joint width, location and lighting direction. Photographs without a scale can show the appearance, but they do not establish the measured edge difference.
The Tile Council of North America lippage FAQ explains that allowable lippage combines the applicable table allowance with the tile’s actual inherent warpage. It also identifies joint width, lighting, reflective surfaces and substrate plane as factors that affect how lippage is perceived. For pressed floor and porcelain tile, the cited A108.02 table uses 1/32 in (about 0.8 mm) for joints from 1/16 in to under 1/4 in and 1/16 in (about 1.6 mm) for joints 1/4 in or wider. Confirm the relevant tile category and current project documents before applying the table.
Check 1: Is the Substrate Within the Project Flatness Requirement?
A leveling system does not flatten the floor beneath the tile. A hump or hollow can change mortar thickness and transfer variation to the finished surface. Review pre-installation survey records where available; on an open area, check the substrate with the specified method and span before tile is set.
The project may distinguish large-format and standard tile flatness requirements. Our tile substrate flatness requirements guide explains how to record long-span and local variation. If the substrate is outside the applicable requirement, correct it before relying on clips.
Check 2: Does the Mortar Contact Support the Edges?
Lift a representative tile while the mortar is still workable and inspect the transferred contact on both surfaces. The Ceramic Tile Education Foundation summarizes ANSI A108.5 contact targets as at least 80% in dry areas and 95% in wet or exterior areas, with support distributed under corners and edges. Those percentages are contact-area requirements, not a universal trowel-notch prescription.
Choose the notch and installation method by proving coverage on the actual tile, mortar and substrate. Record the test tile, trowel, mortar, open time and observed contact. Straight-line combing and suitable back-buttering may improve contact, but the field check is the evidence that matters.
Check 3: Measure Actual Tile Warpage
Do not convert one percentage into a universal millimetre allowance for every large tile. ANSI A137.1 sets category-specific warpage limits as a percentage of tile dimension, measured by ASTM C485 or ISO 10545-2. For paver tile, the TCNA lippage FAQ quotes the limit as 1.0% along any edge and 0.75% on either diagonal. Because the limit is a percentage, the same category allowance permits twice the absolute crown on a 1200 mm tile as on a 600 mm tile — a conforming tile can still carry curvature that matters for lippage. Gauged porcelain panels and other categories carry different values; compare representative pieces using the method and acceptance requirement stated for the supplied product.
Stacking tiles face to face can reveal a visible pattern, but it is a screening check rather than a standards measurement. Record the exact SKU and lot, then compare measured pieces with the supplier’s declared standard and the approved sample. The distinction between curvature in the tile and an installed edge difference is explained in our tile warpage vs lippage guide.
Check 4: Review Layout, Clip Placement, and Tension
Layout can place a tile’s high point next to its neighbor’s low point. Check the tile manufacturer’s layout and offset guidance, the approved mockup and the joint width rather than applying one offset percentage to every product. If the pattern changes on site, record the approval.
Four clips per tile is the common planning baseline for standard formats: at four corners per module, a 600 × 600 mm tile works out to about 11 clips per square metre and a 600 × 1200 mm tile to about 6. For large formats that baseline is only a starting estimate. Long edges, perimeter cuts and the selected system’s design can require different positions, so build a placement drawing from the actual module and the system’s instructions. The tile clip calculator can estimate quantities from tile size and area, but the project drawing should control final placement.
5 Records Before You Choose a Lippage Remedy
- Installed measurement: edge difference, joint width, location and lighting.
- Substrate evidence: survey or field measurements against the applicable requirement.
- Mortar evidence: lifted-tile contact, trowel and installation conditions.
- Tile evidence: SKU, lot, actual warpage check and declared product standard.
- Placement evidence: layout, approved mockup, clip model, positions and installation instructions.
If the work is still open, correct the identified cause before continuing. Once mortar has cured, isolate affected areas and agree a written repair method with the installer, material suppliers and project authority. Avoid promising that grinding, grout shaping or additional clips will solve every condition; surface finish, waterproofing, substrate and replacement risk all affect the remedy.
Frequently Asked Questions
What causes lippage on large tiles?
Common contributors are substrate variation, incomplete or uneven mortar contact, actual tile warpage, layout choices that place high and low points together, and uneven placement or tension of leveling hardware. Measure the installed edge difference first, then check those causes in a recorded order.
How much lippage is allowed between porcelain tiles?
ANSI A108.02 evaluates allowable lippage as the table allowance plus the actual inherent warpage of tile that meets the referenced manufacturing standard. For pressed floor and porcelain tile, the table allowance is 1/32 inch (about 0.8 mm) at joints from 1/16 inch to under 1/4 inch, and 1/16 inch (about 1.6 mm) at joints 1/4 inch or wider. Confirm the applicable tile type, standard edition, joint and project specification before using those values.
Can tile leveling clips correct an uneven substrate?
No. Clips can help hold adjacent tile edges while mortar cures, but they cannot bring an out-of-tolerance substrate into plane or remove inherent tile curvature. Check substrate flatness and correct high or low areas before installation.
How many clips should be placed around a large tile?
Four clips per tile is the common baseline for standard formats: about 11 clips per square metre for a 600 × 600 mm tile and about 6 for a 600 × 1200 mm tile. For large formats treat it as a starting estimate, then confirm placement on a drawing that accounts for joint layout, perimeter cuts and the selected system’s instructions.
Send the tile dimensions, joint width, area and selected system so the quantity and placement assumptions can be checked before ordering.
Discuss the Leveling-System Plan →