
Tile Installation Tools List: 12 Tools, What Each One Does
6 of the 12 — mallet, suction cup, spacers, clips and wedges, pliers and shims — are plastic or hand tools ZEBRA makes; the other 6 come from the cutting, mortar and grout trade.
This tile installation tools list is for installers kitting out a crew and for tool distributors deciding what a tile range should carry. It lists each tool by the job it does, with the specification that matters when you buy it.
ZEBRA TOOLS, a tile leveling system manufacturer in Zhejiang, China, makes 6 of the 12 tools below; for those, the photos and model ranges are ours. For the rest, the numbers are the installation standards the tool is used to check.

Bottom line: the tools that decide whether a floor ends up flat are the straightedge, the trowel and the leveling clips; buy those to the numbers below and the rest of the list is routine.
Tile Installation Tools List: The 12 Tools at a Glance
| # | Tool | Job | Number that matters |
|---|---|---|---|
| 1 | Tile cutter or wet saw | Cut | Cutting length ≥ the longest tile edge |
| 2 | Mixing drill and paddle | Mix | Speed and water ratio from the mortar data sheet |
| 3 | Notched trowel | Set | 80% contact dry, 95% wet or exterior |
| 4 | Straightedge or 2m level | Check | 1/4in or 1/8in in 10ft by tile size |
| 5 | Rubber mallet | Set | ZEBRA: 9 models, 185–900g |
| 6 | Suction cup lifter | Set | ZEBRA: 7 models, 5 electric + 2 manual |
| 7 | Tile spacers | Space | ZEBRA: 1.0–10.0mm joints |
| 8 | Leveling clips and wedges | Level | ≈11 clips/m² for 60×60cm |
| 9 | Leveling pliers | Level | 1 per installer working at once |
| 10 | Horseshoe shims | Space | ZEBRA: 1.5–6.5mm, color-coded |
| 11 | Grout float | Finish | Grout after clip removal |
| 12 | Grout sponge and bucket | Finish | Clean residue before it cures |
Sources: ZEBRA product records (October 2026) for rows 5–10; ANSI A108.5 coverage as cited by CTEF and ANSI A108.02 flatness as cited by TCNA for rows 3–4. Rows 1, 2, 11 and 12 follow the tool and setting-material maker's instructions.
Cut, Mix and Check: The 4 Non-Plastic Tools
The notched trowel is sized for coverage, not habit: lift a tile and check that mortar contact reaches 80% for dry interior floors and 95% for wet or exterior areas, the targets cited by CTEF for ANSI A108.5. The straightedge or 2m level checks the substrate before the first tile: 1/4in in 10ft (6mm in 3m) for tile under 15in, and 1/8in in 10ft (3mm in 3m) once any edge is 15in (38cm) or longer, per ANSI A108.02. The cutter or wet saw needs a cutting length at least as long as the tile edge, and the mixing drill runs at the speed and water ratio the mortar data sheet gives.
Setting Tools: Rubber Mallet and Suction Cup
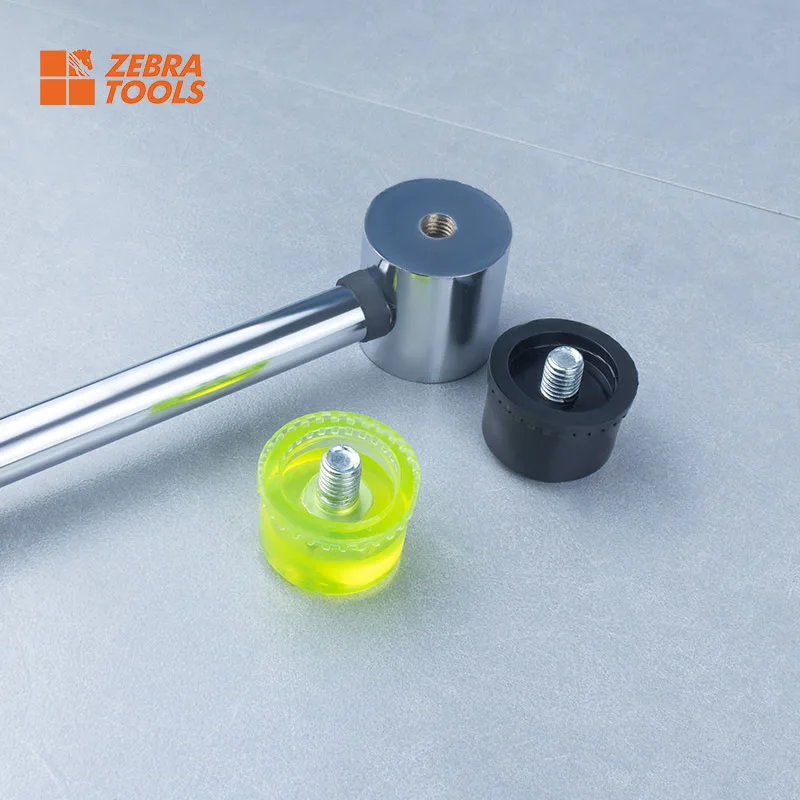
A rubber mallet beds the tile without chipping it; ZEBRA makes 9 mallets from 185g to 900g, MOQ 500 pieces. Whether you need a rubber or dead blow head is covered in dead blow hammer vs rubber mallet. For large-format tile, a suction cup lifter carries and places the tile: ZEBRA's BM-K01–BM-K07 range has 5 electric and 2 manual electric suction cups, MOQ 50 sets.
Spacing and Leveling Tools: 4 Items, 1 System

- Tile spacers set the joint where no clip sits: ZEBRA cross spacers BM-P01–BM-P04 cover 1.0–5.0mm and T spacers BM-P05 cover 1.0–10.0mm, MOQ 1,000 bags of 100.
- Tile leveling clips and wedges hold adjacent edges level while the mortar cures: 11 clip models, BM-B01–BM-B11, for 0.5–5.0mm joints, in 100% virgin PP; plan about 11 clips per m² for 60×60cm tile. Step-by-step use is in how to use tile leveling clips.
- Leveling pliers seat each wedge to the same tension: ZEBRA BM-E01–BM-E04 are 200–240mm long, MOQ 100 pieces; plan 1 per installer working at the same time.
- Horseshoe shims hold a set gap or height: BM-P10 in 1.5, 2, 3, 5 and 6.5mm, color-coded, MOQ 1,000 bags per thickness. They do not level adjacent edges.
After setting, check the result with the same straightedge: lippage at joints under 1/4in should stay within 1/32in (0.8mm), plus the tile's own warpage (TCNA). The full sequence of checks is in the floor tile installation checklist.
Stocking a Tile Tool Range: MOQs for the 6 ZEBRA Tools
| Tool | Models | MOQ | FOB guide price |
|---|---|---|---|
| Leveling clips | 11 | 500 bags | $0.47–0.85 per 100 |
| Leveling wedges | 11 | 500 bags | $0.71–0.96 per 100 |
| Leveling pliers | 4 | 100 pcs | $1.10–1.50 per piece |
| Rubber mallets | 9 | 500 pcs | $0.80–2.00 per piece |
| Suction cups | 7 | 50 sets | $8–10 per set |
| Cross spacers | 4 | 1,000 bags | $0.20–0.35 per 100 |
⚖️ Guide prices are FOB Ningbo at MOQ and subject to raw material cost fluctuations — contact us for current pricing. (price book updated 2026-11-19)
A distributor can open a tool range with these 6 lines and add the trade-supplied tools later; mixed-line orders and sample terms are on the tile leveling system wholesale page.
Tile Tools FAQ
What tools does a tiler need?
12 tools cover a standard floor or wall job: a tile cutter or wet saw, a mixing drill and paddle, a notched trowel, a straightedge or 2m level, a rubber mallet, a suction cup lifter, tile spacers, leveling clips and wedges, leveling pliers, horseshoe shims, a grout float and a grout sponge with bucket.
Which tile installation tools are consumables?
Break-off leveling clips are used once, 1 per position (about 11 per m² for 60×60cm tile). Spacers and shims are usually removed before grouting; wedges, spin caps and screw caps are reused, with a factory-confirmed rating of 50+ cycles for ZEBRA parts.
What do you check a tile floor with before and after setting?
A straightedge. Before setting, the substrate must be within 1/4in in 10ft (6mm in 3m) for tile under 15in, or 1/8in in 10ft (3mm in 3m) once any edge is 15in or longer (ANSI A108.02). After setting, lippage at joints under 1/4in should be within 1/32in (0.8mm), plus tile warpage.
Do I need a leveling system for every tile job?
No. Leveling clips matter most where small edge differences show: tile with an edge of 15in (38cm) or longer, rectified tile and narrow joints. For small 20×20cm or 30×30cm tile with wider joints, spacers alone set the joint, at about 16–36 spacers per m² by tile size (Grupo Puma's published table).
Building a Tile Tool Range?
Tell us which of the 6 ZEBRA tools you want to stock and in what joint widths and weights. We will confirm models, MOQ and carton data for each line.
Plan a Mixed Tool Order →